You have enough on your plate, and when it comes to selling your devices on Swappa we know your time is limited. That’s why we created Swappa’s Incoming Inventory. It’s a powerful tool that helps you list multiple devices faster than ever.
In this post, we’ll show you how to use Swappa Incoming Inventory, so you can quickly get your inventory in front of Swappa’s community of qualified buyers by working smarter — not harder.
Swappa Incoming Inventory
Incoming Inventory improves the listing process for volume sellers by providing a flexible framework and tools to help speed up the listing process. Whether you are a team of one or have multiple people completing tasks at different stages of the listing process, you can mold the Incoming Inventory workflow to meet your needs.
With Incoming Inventory, you are no longer bound to a linear, start-to-finish listing process. Instead, you can add items and edit device details in bulk. In addition, Incoming Inventory allows you to pause and take breaks at any time — and resume exactly where you left off. This enables you to improve workflow efficiency and increase listing throughput, ultimately benefiting your bottom line.
Note: Swappa’s Incoming Inventory is available for Power Sellers.
Incoming Inventory acts as a staging area, allowing sellers to start the listing process in a variety of ways:
- Adding devices individually
- Adding ESN/IMEI numbers for multiple devices at a time
- Importing devices from a spreadsheet
Note: For added convenience, you can also directly import items from WholeCell, an external inventory management system built from the ground up for selling mobile devices.
Before we get into the specifics for each of the above-listed methods – let’s take a look at the Incoming Inventory homepage.
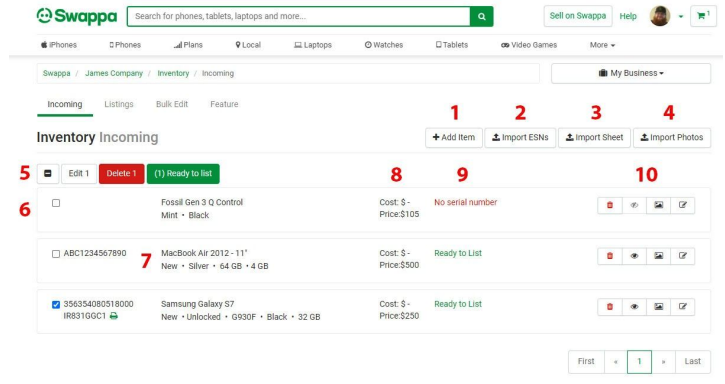
- Add Item – Add single inventory item
- Import ESNs – Import one or more inventory items using ESNs
- Import Sheet – Import items using spreadsheet (.xlsx, .csv)
- Import Photos – add device photos to a photo bank
- Multiselect actions – edit multiple inventory items at once, list completed items
- Inventory Item – by column (IMEI/ESN, Product w/ variant, cost/price, inventory item status, user actions – delete, preview, photos, edit)
- Product – product name and variant
- Cost/Price – user’s cost of device / user’s asking price for device
- Inventory Item Status – description of what is needed to get an inventory item ‘Ready to List’
- Inventory Item Actions – delete, preview listing, add photos, edit
How to add single items
From the Swappa homepage, you can quickly access your Incoming Inventory and add a single item by following these steps:
- Select your profile and then from the dropdown menu, select My Business.
- From your Business Dashboard, select Incoming under the Inventory category.
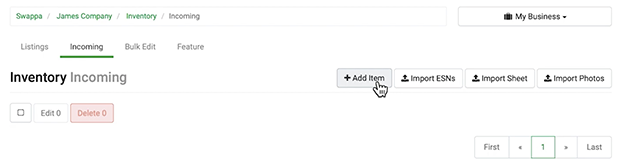
- From the Incoming Inventory homepage, click the ‘Add Item’ button to manually add a single item.
- Enter the device’s serial number and product details along with a condition, price, headline, and description.
- After saving your changes, use the ‘Add Photos’ button to upload photos to the inventory item.
- You’ll be able to upload new photos or add existing images from your image bank.
- You can use your profile code rather than the traditional Swappa listing code in your verification photos.
- When you’re happy with your photos, click the link at the top of the page to return to the Incoming Inventory homepage.
Now it’s time to make your inventory items live…
- Select the inventory items you’re ready to publish and click the green ‘Ready to List’ button.
- Enter your Ship from information and hit the ‘Create Listings’ button to publish your inventory items.
- From there, your listing will enter Swappa’s moderation process to be approved by one of our staff members.
How to import multiple ESNs
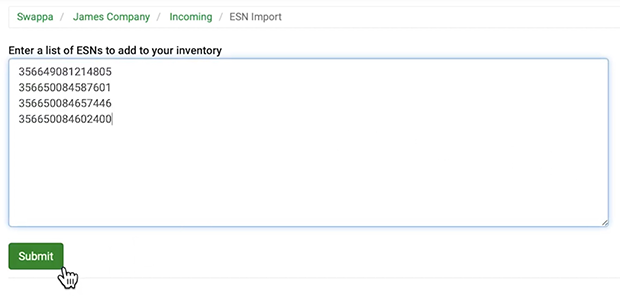
The Import ESN feature allows you to create multiple inventory items by simply copying/pasting a list of valid ESNs. Here’s how it works:
- Enter your list of device ESNs into the text field and click the ‘Submit’ button.
- Swappa’s system will try to auto-match the ESNs to existing products in our catalog.
- You can select the product from the dropdown, type in the name of the product, or submit the ESN without a product attached.
Once you’ve completed the product selection process, you’ll need to edit each listing where you can provide missing information like product variant, condition, price, and description. That’s how easy it is to import ESNs into the Incoming Inventory.
How to import from a spreadsheet
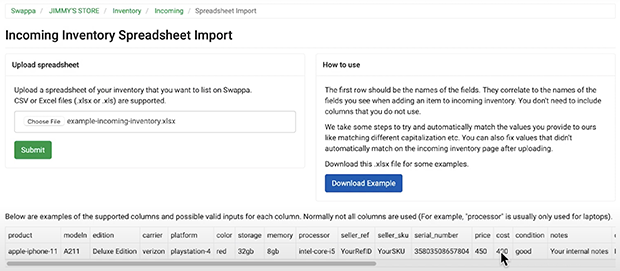
The import spreadsheet feature is a convenient way to create a large number of incoming inventory items in next to no time. If you need help getting started, we even provide an example spreadsheet you can download from the Import Spreadsheet page. Feel free to edit the sample and use it as a template.
- From the Incoming Inventory page select Import Spreadsheet
- Click the Choose File button to find your spreadsheet
- Select the Submit button to import your spreadsheet
Once your spreadsheet has been uploaded and submitted, you’ll be taken back to the Incoming Inventory homepage where you can edit your newly imported inventory items and add pictures.
Note: Sellers adding devices from spreadsheets (.xlsx or .csv format) can further optimize the listing process by importing several key device characteristics. The list of device characteristics supported when using the spreadsheet import method includes:
product, modeln, edition, carrier, platform, color, storage, memory, processor, seller_ref, seller_sku, serial_number, price, cost, condition, notes, description, damage_description, headline, quantity_available
How to use multi-select edit
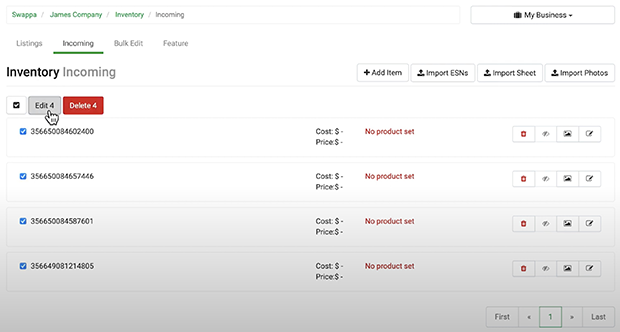
If you’re listing batches of products through Incoming Inventory that have similar product variant details like color, condition, price, or description; you can change those details across multiple inventory items all at once using the multi-select edit feature.
- Select each inventory item you’d like to change and click the ‘Edit’ button.
- You’re now editing multiple inventory items. Any changes you make on the edit screen will be applied to the items you have selected.
Additional notes:
- Fields left blank on the edit screen will remain unchanged.
- To clear a specific field, you will need to edit the item individually.
- To delete inventory items, you can select one or more items and click the ‘Delete’ button.
And that’s everything you need to know to get up and running with Swappa’s Incoming Inventory. Feel free to reach out to us by tapping the green button below and a member of Swappa’s helpful staff will be happy to answer any questions or assist you in enabling this powerful new tool.
WholeCell.io + Swappa integration
The listing creation process can be further optimized by using an external inventory management system, such as WholeCell, a leading end-to-end inventory management solution built from the ground up for mobile devices.
WholeCell customers can import inventory items directly into Swappa Incoming Inventory with the click of a button, and Swappa orders are automatically populated within WholeCell, facilitating order tracking and management.
WholeCell is currently offering a 15-day free trial for Swappa sellers.
Swappa is a safe and easy-to-use marketplace to buy and sell gently used tech. Whether you’re a high-volume cell phone wholesaler or a small business getting started in the world of resale, Swappa is the best place to sell gently used tech. We directly connect buyers and sellers to make sure that you get the most money for your iPhones, iPads, MacBooks, Galaxy phones, cameras, game consoles, video games, and more.
