Getting a new iPhone is very exciting. Unless it was a spur-of-the-moment purchase, you probably spent some time thinking about what to do once it’s in your hands. You may even have a plan outlined in your mind, but the initial excitement can lead to some steps being overlooked, or simply forgotten. Here are the first things to do when you get your new iPhone.
Let’s assume you already activated the iPhone with your wireless carrier and that this isn’t your first iPhone. But before you do anything further with your new iPhone – you should make sure all the data on your current iPhone has been backed up.
How to backup your iPhone
Apple makes it easy to backup your iPhone with iCloud, or with your Mac or Windows computer. You can backup your iPhone with iCloud using the following steps:
- Connect to a WiFi network
- Go to Settings -> [Your iCloud Name] -> iCloud
- Tap iCloud Backup
On a Mac or Windows computer:
- Open a Finder window on Mac, or open iTunes on Windows
- Connect your iPhone to your computer with a USB cable
- If prompted, enter your iPhone password, or click Trust This Computer
- Select your iPhone
- If backing up your Health and Activity data make sure you select the “Encrypt local backup” option
- Click Back Up Now
Start fresh, or start from a backup?
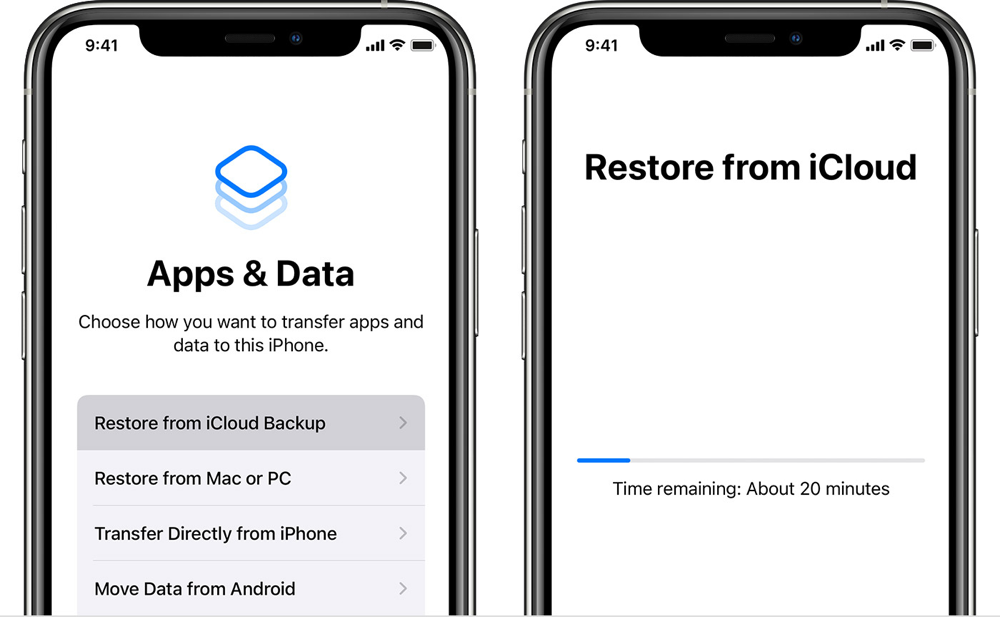
Now that you’ve finished backing up your old iPhone, the next step is deciding how you want to get started with your new iPhone – fresh or from a backup. Each of these options has some positive points and some drawbacks.
We tend to accumulate data and apps on our smartphones, so starting fresh is a great way to get all of the older and unused apps off your phone. Starting fresh means you’ll be bringing stuff over and adding apps as they are needed. But it also means you’ll be able to start using your new phone immediately.
Starting from a backup of your previous iPhone takes a bit of time, so you should be prepared to let your iPhone sit for a little while all your data transfers over to your new iPhone. If you start from a backup, there may be a few small things you need to do once the data has finished transferring, such as entering some passwords. But overall, starting from a backup is the simplest way to get started with a new iPhone.
Make use of Apple iCloud
Apple iCloud is a useful feature that stores and syncs your photos, videos, passwords, and data in the cloud. Apple also makes it incredibly easy to set up and use. And, if you’ve been using an iPhone you likely already have an Apple ID, which means you’ll need to take note of your email address and password to get logged in. Apple offers 5GB of iCloud storage space for free, which is nice. But if you’re the type of person who is always taking pictures or recording video, that 5G limit may not be enough.
Setting up your iPhone presents the perfect opportunity to review your current iCloud settings, which can be done by navigating to Settings, and then tapping on your name (towards the top of the screen). From there tap on iCloud and that will show you details on your current plan, and allow you to set different items to back up to your iCloud account.
The paid iCloud options are called iCloud+ and there is an option to get 50GB, 200GB, or 2TB of storage space. The prices for these plans are billed monthly at $0.99 (50GB), $2.99 (200GB), or $9.99 (2TB). In addition to the iCloud storage space, you also get benefits such as iCloud Private Relay, Hide My Email, Custom Email Domain, and HomeKit Secure Video support.
Another perk of using iCloud is being able to access your data from other devices. Once synced with iCloud through your iPhone – you can easily access the same data from your iPad, Mac computer, or even a web browser using the iCloud website.
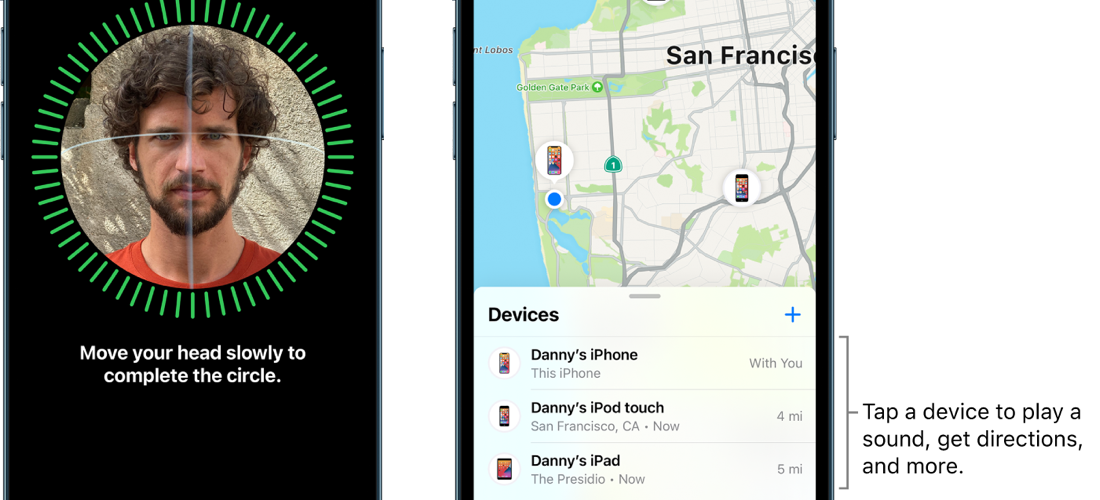
Secure your iPhone
Apple offers numerous options and settings to secure your iPhone. We mentioned a few in the iCloud section, but iCloud Private Relay and Hide My Email are just the beginning. You should make sure to set a strong passcode. Doing so means your iPhone data will be encrypted with 256-bit AES encryption. It also means someone will not be able to easily access your phone.
Some of the other options you have to secure your iPhone are as follows:
- Face ID (or Touch ID)
- Find My iPhone
Of course, if you’re taking full advantage of iCloud and syncing your data to the cloud – you also want to make sure you have a strong password set on your iCloud account, and that you are using two-factor authentication for added security.
Check out the default Apple apps
One perk of using an iPhone is the App Store. Having access to countless third-party apps is absolutely wonderful, but you should make sure to check out the default Apple apps before running off to a third-party app. The reasoning here is simple: The default Apple apps are streamlined, efficient, and coded to take full advantage of iOS.
Some of the default apps that often get overlooked include Mail, Messages, Calendar, and Contacts. These four apps take full advantage of iOS and iCloud, so you can sync your important data and be able to access it on other devices. You should also make sure to check out Apple Pay, as well as some other services like Apple Music.
Diving in a little deeper, Apple also offers a great Do Not Disturb option, which allows you to decide when you want to be bothered. Or maybe more accurate, decide when you don’t want to be bothered. You can set up Apple’s Do Not Disturb by navigating to Settings -> Focus.
Another app that is often overlooked, especially by those who have been using an iPhone for a while is the Apple Tips app. The Tips app offers details on everything from getting started with your iPhone, to essential features such as how to add a Recovery Contact, taking screenshots, seeing when a message was sent, using AirDrop, and more.
Make it your own
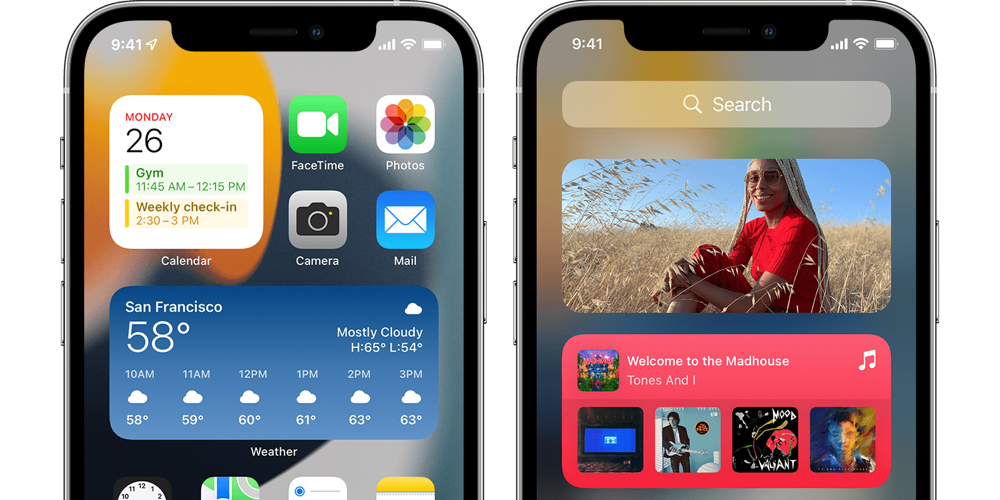
Now that you’ve gotten up and running on your new iPhone – it is time to make it your own by doing a bit of customization. Holding down on an app icon will set them to “jiggle’ mode, which is what you’ll need to start moving the icons around. You can also drag apps in and out of the dock (the iPhone is a phone, but the Phone app doesn’t need to stay in the dock if you rarely make calls), so make sure you drag your preferred or most-used apps to the dock.
Apple also offers numerous widget options, and widgets can live on the Today View (which can be accessed by swiping right from the left edge of the Home screen), or on a Home Screen. You can begin browsing the available widgets by pressing and holding on the Home screen and then tapping the “+” icon in the upper left.
This includes a topic that may not be as popular or as welcomed by all users, especially those who think of their smartphone as being a ‘personal’ device, but quite a bit of work can be done on your iPhone while on the go.
This is also a great time to start adding third-party apps (assuming the default Apple apps didn’t meet your requirements) and setting them as the default option. You can set a different browser or email app as your default by navigating to the settings and then locating the third-party app you want to set as the default.
Clean up the clutter
The last tip is to make sure you clear the Home screen of any clutter. Previously that meant dragging all of the unused apps to a folder, and hiding that folder away on a screen that you rarely look at – but you can now make use of the App Library.
You can access the App Library by swiping left (from your Home screen) until you reach the App Library. The Apple Library has a search box towards the top of your screen for quick access to different apps, and Apple also has category options, such as Suggestions, Recently Added, Social, Entertainment, and more.
When you install an app on your iPhone it is automatically added to your Home screen and to the App Library, but the icon doesn’t have to stay in both places. If you press and hold on an app icon and tap “Remove App” you will be given the option to fully delete the app, or to remove it from the Home screen.
Now that you have finished setting up your new iPhone, you should consider selling your old iPhone. Selling your old iPhone ensures it stays in use and isn’t going to end up sitting in a drawer. But perhaps more importantly – selling your old iPhone allows you to get some cash, which could go towards off-setting the cost of your new iPhone. You can get started selling your iPhone on Swappa, the safest marketplace for used tech, by tapping the green button below.
